Solar System Tutorial
Written by: @HololeoOverview
This tutorial introduces developing HoloLens applications in JavaScript based on buildwagon, a hololens development platform and libraries that make HoloLens development in JavaScript easy.
The goal of this section is to give you a brief introduction by setting up a basic HoloLens application that displays part of the solar system in 3D.
Part I - Introduction
In this tutorial we will create a simple solar system animation with the sun, earth, and moon. It is divided into three parts:
- In part 1, we layout our scene and add our basic geometry.
- In part 2, we add textures.
- In part 3, we animate our scene with planet spin and orbits.
First we create our HoloCamera, HoloSpace, and HoloRenderer
var hololens = new HoloBuild.HoloCamera();
var holoscene = new HoloBuild.HoloSpace();
var holorenderer = new HoloBuild.HoloRenderer();
Next we create our planets.
Each planet geometry is defined by a HoloSphereGeometry. The sphere radius will be proportionally sized with
the sun having 0.2, the earth 0.1 and the moon 0.05. We give each planet a color with HoloMeshBasicMaterial.
Then we combine the geometry and material with HoloMesh.
// create a sun
var geometry = new HoloBuild.HoloSphereGeometry(0.2, 30, 30);
var material = new HoloBuild.HoloMeshBasicMaterial({ color: 'yellow' });
var sun = new HoloBuild.HoloMesh(geometry, material, true);

// create an earth
var geometry = new HoloBuild.HoloSphereGeometry(0.1, 30, 30);
var material = new HoloBuild.HoloMeshBasicMaterial({ color: 'blue' });
var earth = new HoloBuild.HoloMesh(geometry, material, true);

// create a moon
var geometry = new HoloBuild.HoloSphereGeometry(0.05, 30, 30);
var material = new HoloBuild.HoloMeshBasicMaterial({ color: 'white' });
var moon = new HoloBuild.HoloMesh(geometry, material, true);
Next we group the earth and moon using HoloGroup. This is important so that we can orbit this group around the sun.
// group the earth and the moon
var earth_group = new HoloBuild.HoloGroup();
earth_group.add(earth);
earth_group.add(moon);

// offset moon by 0.2 on the X axis with its group's local space
moon.position.set(0.2,0,0);
Lets create a group we call solar_system and add the sun and the earth_group to it.
// create a solar_system group. Add sun + earth group
var solar_system = new HoloBuild.HoloGroup();
solar_system.add (sun);
solar_system.add (earth_group);
Our earth_group sits inside the sun, so lets position it along side the sun on the X axis
earth_group.position.set (0.6,0,0);
Lets see what we have so far. Add 'solar_system' group to the holoscene. This will add all its children: sun, earth, and moon. Then create a renderloop function.
holoscene.add(solar_system);
function renderloop() {
	window.requestAnimationFrame(renderloop);
	holorenderer.render(holoscene, hololens);
}
renderloop();
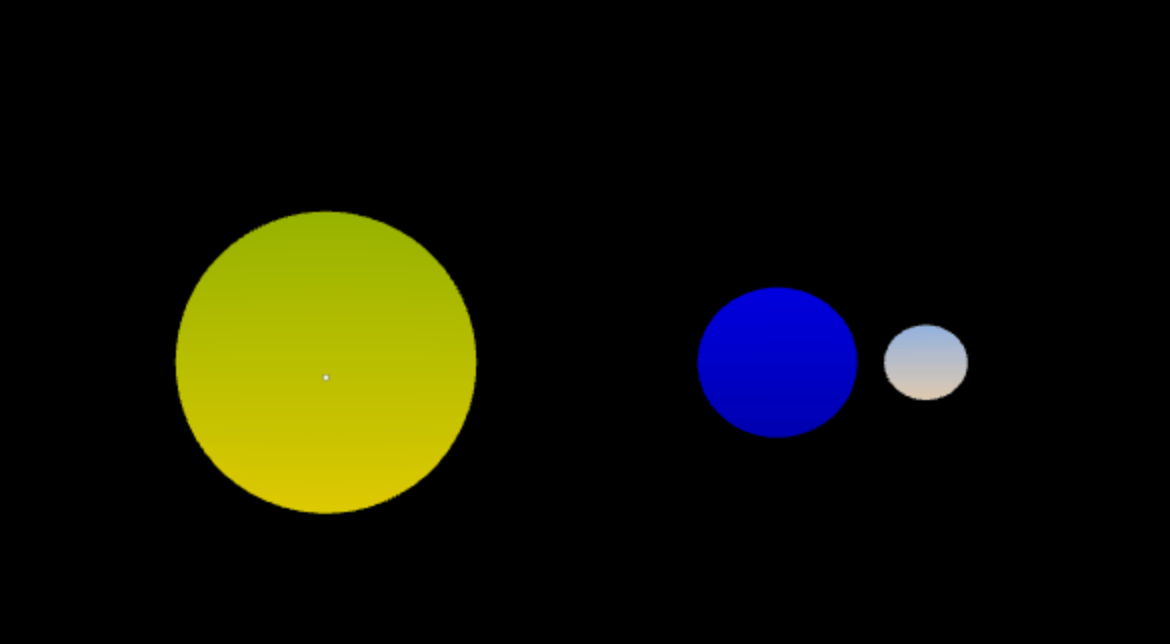
Here is what you should see in the emulator
Next, in Part 2 we add textures to our objects.
Complete code listing for part 1:
var hololens = new HoloBuild.HoloCamera();
var holoscene = new HoloBuild.HoloSpace();
var holorenderer = new HoloBuild.HoloRenderer();

// create a sun
var geometry = new HoloBuild.HoloSphereGeometry(0.2, 30, 30);
var material = new HoloBuild.HoloMeshBasicMaterial({ color: 'yellow' });
var sun = new HoloBuild.HoloMesh(geometry, material, true);

// create an earth
var geometry = new HoloBuild.HoloSphereGeometry(0.1, 30, 30);
var material = new HoloBuild.HoloMeshBasicMaterial({ color: 'blue' });
var earth = new HoloBuild.HoloMesh(geometry, material, true);

// create a moon
var geometry = new HoloBuild.HoloSphereGeometry(0.05, 30, 30);
var material = new HoloBuild.HoloMeshBasicMaterial({ color: 'white' });
var moon = new HoloBuild.HoloMesh(geometry, material, true);

// group the earth and the moon
var earth_group = new HoloBuild.HoloGroup();
earth_group.add(earth);
earth_group.add(moon);

// offset moon by 0.2 on the X axis with its group's local space
moon.position.set(0.2,0,0);

// create a solar_system group. Add sun + earth group
var solar_system = new HoloBuild.HoloGroup();
solar_system.add (sun);
solar_system.add (earth_group);

// offset earth_group by 0.6 on the X axis in local space
earth_group.position.set (0.6,0,0);

// add solar_system group to scene
holoscene.add(solar_system);

function renderloop() {
	window.requestAnimationFrame(renderloop);
	holorenderer.render(holoscene, hololens);
}
renderloop();
Part 2 - Adding textures
In part 2 we add textures to the planets.
Our sun, earth, and moon will have their own textures. We will use planet textures from planetpixelemporium.com
Note: every texture should be sized to a power of 2 (ie 512, 1024).
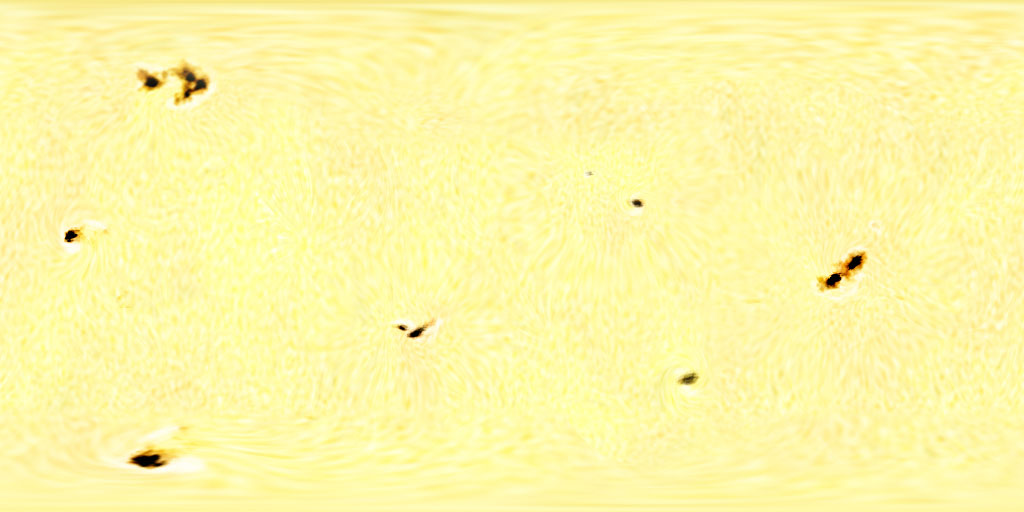
sun.jpg
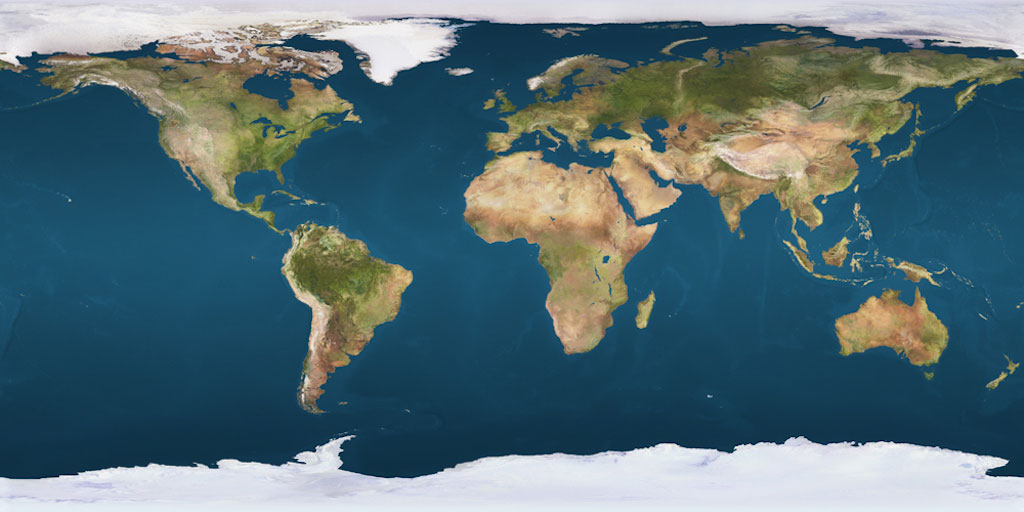
earth.jpg
moon.jpg

Upload the texture images to your account.
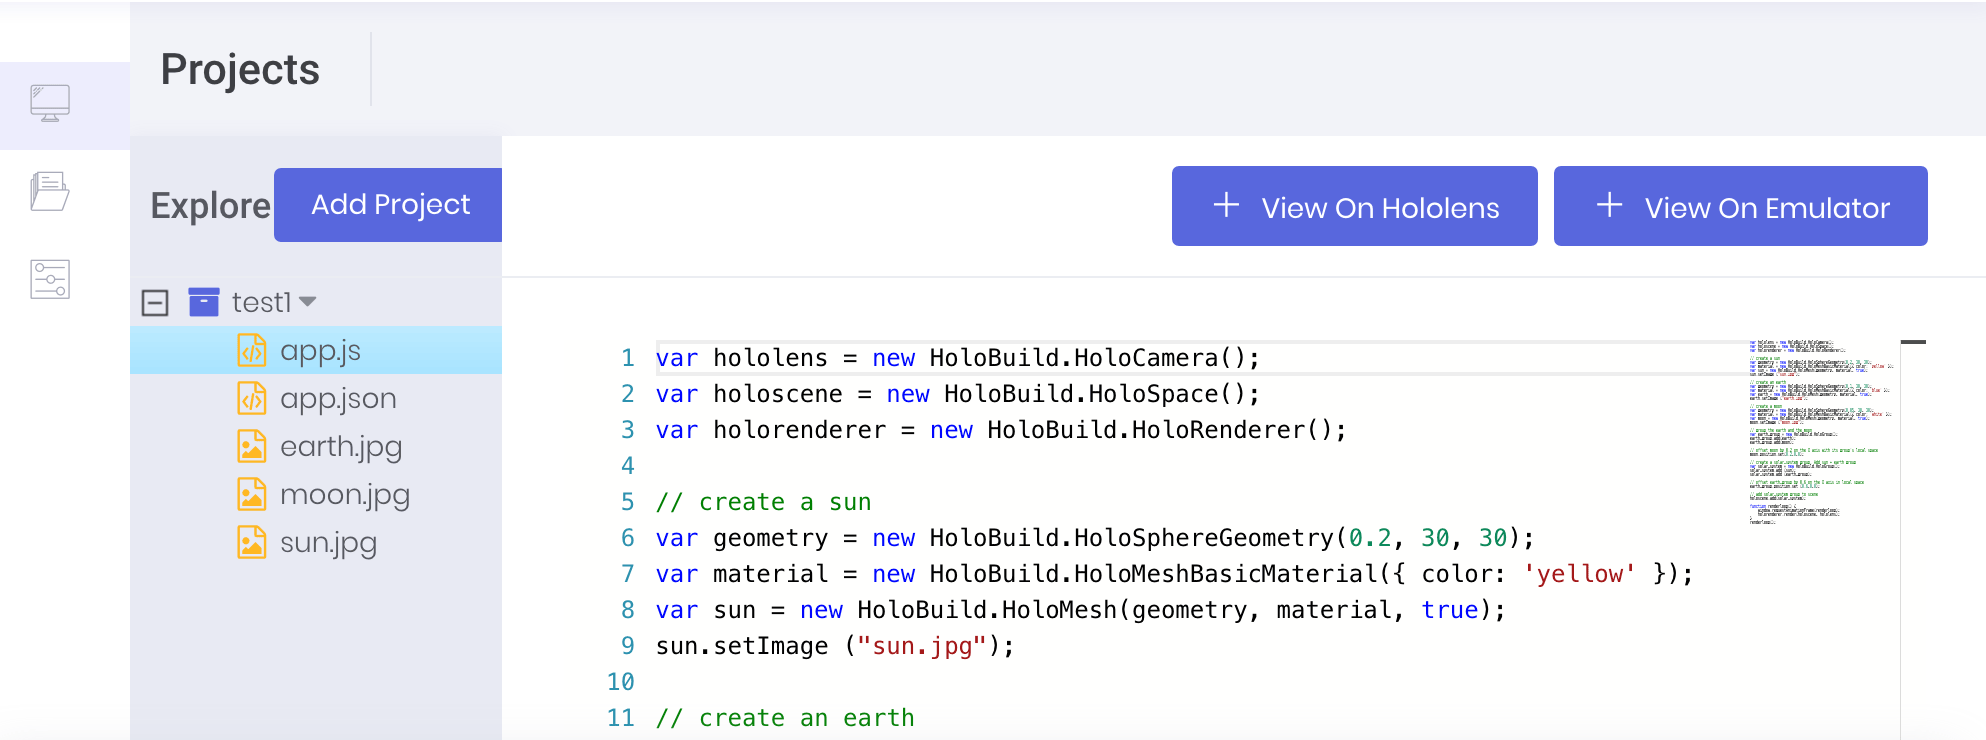
To add a texture, we use the HoloMesh.setImage(url) method of our planets. We call this method after creating the planet mesh. Modify the planet code to look like this:
// create a sun
var geometry = new HoloBuild.HoloSphereGeometry(0.2, 30, 30);
var material = new HoloBuild.HoloMeshBasicMaterial({ color: 'yellow' });
var sun = new HoloBuild.HoloMesh(geometry, material, true);
sun.setImage ("sun.jpg");

// create an earth
var geometry = new HoloBuild.HoloSphereGeometry(0.1, 30, 30);
var material = new HoloBuild.HoloMeshBasicMaterial({ color: 'blue' });
var earth = new HoloBuild.HoloMesh(geometry, material, true);
earth.setImage ("earth.jpg");

// create a moon
var geometry = new HoloBuild.HoloSphereGeometry(0.05, 30, 30);
var material = new HoloBuild.HoloMeshBasicMaterial({ color: 'white' });
var moon = new HoloBuild.HoloMesh(geometry, material, true);
moon.setImage ("moon.jpg");
Now our scene in the emulator will look this:
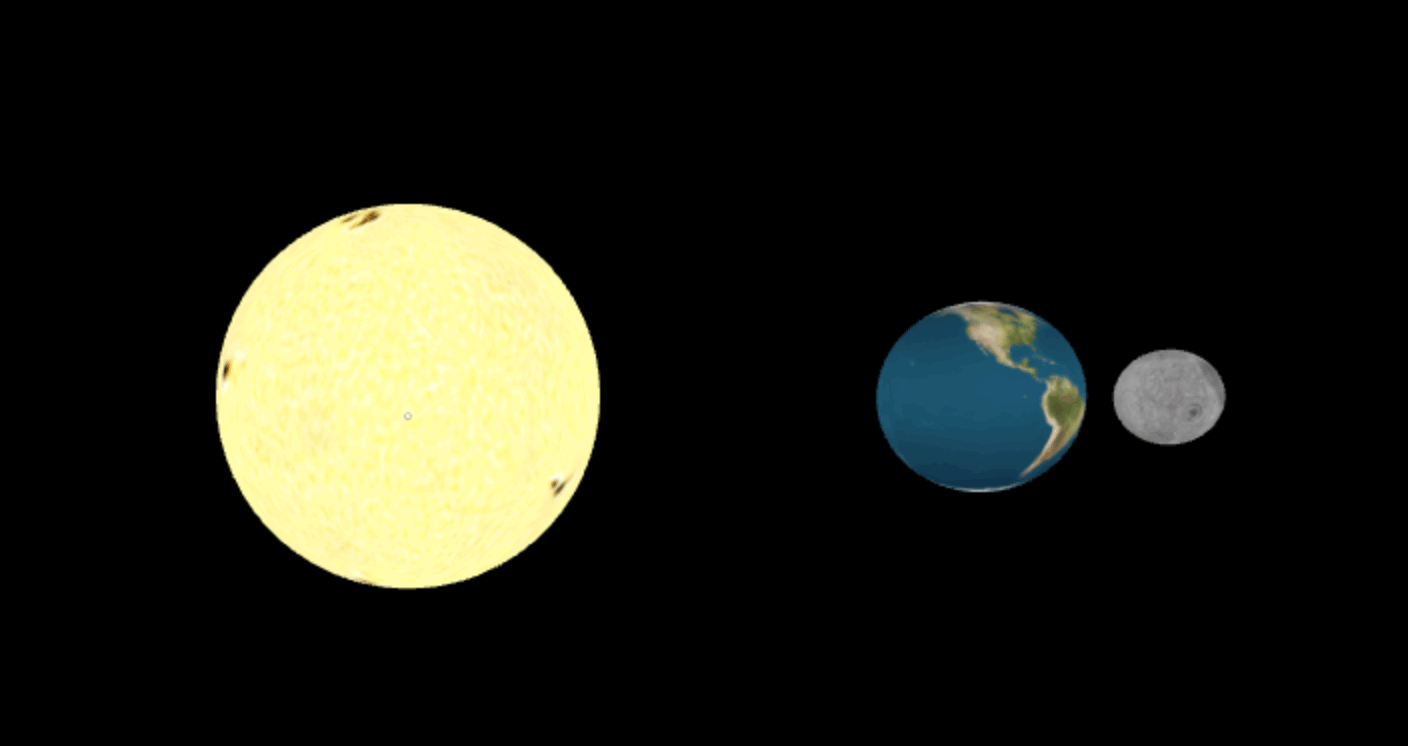
Next, in part 3 we make our planets move.
Complete code listing for part 2:
holoscene = new HoloBuild.HoloSpace();
var holorenderer = new HoloBuild.HoloRenderer();

// create a sun
var geometry = new HoloBuild.HoloSphereGeometry(0.2, 30, 30);
var material = new HoloBuild.HoloMeshBasicMaterial({ color: 'yellow' });
var sun = new HoloBuild.HoloMesh(geometry, material, true);
sun.setImage ("sun.jpg");

// create an earth
var geometry = new HoloBuild.HoloSphereGeometry(0.1, 30, 30);
var material = new HoloBuild.HoloMeshBasicMaterial({ color: 'blue' });
var earth = new HoloBuild.HoloMesh(geometry, material, true);
earth.setImage ("earth.jpg");

// create a moon
var geometry = new HoloBuild.HoloSphereGeometry(0.05, 30, 30);
var material = new HoloBuild.HoloMeshBasicMaterial({ color: 'white' });
var moon = new HoloBuild.HoloMesh(geometry, material, true);
moon.setImage ("moon.jpg");

// group the earth and the moon
var earth_group = new HoloBuild.HoloGroup();
earth_group.add(earth);
earth_group.add(moon);

// offset moon by 0.2 on the X axis with its group's local space
moon.position.set(0.2,0,0);

// create a solar_system group. Add sun + earth group
var solar_system = new HoloBuild.HoloGroup();
solar_system.add (sun);
solar_system.add (earth_group);

// offset earth_group by 0.6 on the X axis in local space
earth_group.position.set (0.6,0,0);

// add solar_system group to scene
holoscene.add(solar_system);

function renderloop() {
	window.requestAnimationFrame(renderloop);
	holorenderer.render(holoscene, hololens);
}
renderloop();
Part 3 - Planet spin and orbits
In part 3 we introduce animation to make our objects spin and orbit.
To make our objects spin, we rotate them along the Y axis. We create a function planetRotations and add it to our renderloop.
function planetRotations() {
	sun.rotation.y += 0.005;
	earth.rotation.y -= 0.005;
	moon.rotation.y -= 0.005;
}
function renderloop() {
	window.requestAnimationFrame(renderloop);
	holorenderer.render(holoscene, hololens);
	planetRotations();
}
Next we create our orbits. First lets create a function that moves the moon along the earth.
// moon orbit around earth
var moon_orbit_num = 0;
var moon_orbit_radius = 0.2;
var moon_orbit_speed = 0.015;
function moon_orbit () {
	moon_orbit_num += moon_orbit_speed;
	var x = Math.cos (moon_orbit_num) * moon_orbit_radius;
	var z = Math.sin(moon_orbit_num) * moon_orbit_radius;
	moon.position.set (x,0,z);
}
The we create an earth orbit to move the earth around the sun.
// earth orbit around sun
var earth_orbit_num = 0;
var earth_orbit_radius = 0.6;
var earth_orbit_speed = 0.005;
function earth_orbit () {
	earth_orbit_num += earth_orbit_speed;
	var x = Math.cos (earth_orbit_num) * earth_orbit_radius;
	var z = Math.sin (earth_orbit_num) * earth_orbit_radius;
	earth_group.position.set (x,0,z);
}
Then add the earth_orbit() and the moon_orbit() to our renderloop.
//renderloop.
function renderloop() {
	window.requestAnimationFrame(renderloop);
	holorenderer.render(holoscene, hololens);
	planetRotations();
	earth_orbit();
	moon_orbit();
}
Finally, lets add a way to move and scale the solar system. We can use HoloMesh.showAdjust() to show the adjust UI when tapping on the objects.
// Tap on solar_system to move it
solar_system.onTap = function () {
	this.showAdjust();
}
Complete code listing for part 3:
var hololens = new HoloBuild.HoloCamera();
var holoscene = new HoloBuild.HoloSpace();
var holorenderer = new HoloBuild.HoloRenderer();

// create a sun
var geometry = new HoloBuild.HoloSphereGeometry(0.2, 30, 30);
var material = new HoloBuild.HoloMeshBasicMaterial({ color: 'yellow' });
var sun = new HoloBuild.HoloMesh(geometry, material, true);
sun.setImage ("sun.jpg");

// create an earth
var geometry = new HoloBuild.HoloSphereGeometry(0.1, 30, 30);
var material = new HoloBuild.HoloMeshBasicMaterial({ color: 'blue' });
var earth = new HoloBuild.HoloMesh(geometry, material, true);
earth.setImage ("earth.jpg");

// create a moon
var geometry = new HoloBuild.HoloSphereGeometry(0.05, 30, 30);
var material = new HoloBuild.HoloMeshBasicMaterial({ color: 'white' });
var moon = new HoloBuild.HoloMesh(geometry, material, true);
moon.setImage ("moon.jpg");

// create an earth group. Add earth + moon
var earth_group = new HoloBuild.HoloGroup();
earth_group.add(earth);
earth_group.add(moon);

// offset moon by 0.2 on the X in local space
moon.position.set(0.2,0,0);

// create a sun group. Add sun + earth group
var solar_system = new HoloBuild.HoloGroup();
solar_system.add (sun);
solar_system.add (earth_group);

// offset earth group by 0.6 on the X axis in local space
earth_group.position.set (0.6,0,0);

// add the the sun group to scene. This will add the moon and earth
holoscene.add(solar_system);

// Tap on solar_system to move it
solar_system.onTap = function () {
	this.showAdjust();
}
function planetRotations() {
	sun.rotation.y += 0.005;
	earth.rotation.y -= 0.005;
	moon.rotation.y -= 0.005;
}

// earth orbit around sun
var earth_orbit_num = 0;
var earth_orbit_radius = 0.6;
var earth_orbit_speed = 0.005;
function earth_orbit () {
	earth_orbit_num += earth_orbit_speed;
	var x = Math.cos (earth_orbit_num) * earth_orbit_radius;
	var z = Math.sin (earth_orbit_num) * earth_orbit_radius;
	earth_group.position.set (x,0,z);
}

// moon orbit around earth
var moon_orbit_num = 0;
var moon_orbit_radius = 0.2;
var moon_orbit_speed = 0.015;

function moon_orbit () {
	moon_orbit_num += moon_orbit_speed;
	var x = Math.cos (moon_orbit_num) * moon_orbit_radius;
	var z = Math.sin(moon_orbit_num) * moon_orbit_radius;
	moon.position.set (x,0,z);
}

function renderloop() {
	window.requestAnimationFrame(renderloop);
	holorenderer.render(holoscene, hololens);
	planetRotations();
	earth_orbit();
	moon_orbit();
}
renderloop();
you can try it on the hololens by starting the buildwagon hololens app and then type: Demo/solar
Try to expand this example to build a complete solar system, or maybe even a galaxy.